Upload a Csv File to S3 Using Python
This article was contributed by Will Webberley
Will is a computer scientist and is enthused by about all aspects of the technology domain. He is specifically interested in mobile and social computing and is currently a researcher in this area at Cardiff University.
Direct to S3 File Uploads in Python
Last updated November 24, 2020
Table of Contents
- Uploading direct to S3
- Overview
- Prerequisites
- Initial setup
- Straight uploading
- Running the app
- Summary
Web applications often require the ability to let users to upload files such as images, movies and archives. Amazon S3 is a pop and reliable storage option for these files.
This article demonstrates how to create a Python application that uploads files directly to S3 instead of via a web awarding, utilising S3's Cross-Origin Resource Sharing (CORS) back up. The article and companion repository consider Python two.seven, simply should be mostly also compatible with Python 3.3 and higher up except where noted beneath.
Uploading directly to S3
A complete instance of the lawmaking discussed in this article is bachelor for direct utilise in this GitHub repository.
The main advantage of direct uploading is that the load on your application'due south dynos would be considerably reduced. Using server-side processes for receiving files and transferring to S3 can needlessly necktie upwardly your dynos and volition mean that they will not be able to reply to simultaneous spider web requests every bit efficiently.
If your application relies on some form of file processing between the client'southward figurer and S3 (such equally parsing Exif information or applying watermarks to images), then you lot may need to use the use of extra dynos and pass the upload through your webserver.
The application uses customer-side JavaScript and Python for signing the requests. It volition therefore be a suitable guide for developing applications for the Flask, Bottle and Django web frameworks. The upload is carried out asynchronously and then that you tin can decide how to handle your application's flow subsequently the upload has completed (for instance, a page redirect upon successful upload rather than a full page refresh).
An example simple business relationship-editing scenario is used as a guide for completing the various steps required to reach the directly upload and to relate the application of this to a wider range of use-cases. More data on this scenario is provided after.
Overview
S3 is comprised of a set of buckets, each with a globally unique proper name, in which individual files (known as objects) and directories, tin be stored.
For uploading files to S3, you will need an Admission Primal ID and a Secret Access Cardinal, which act as a username and password. The access key account will need to take sufficient access privileges to the target bucket in order for the upload to be successful.
Please run across the S3 Article for more information on this, creating buckets and finding your Access Key ID and Clandestine Access Cardinal.
The method described in this article involves the use of client-side JavaScript and server-side Python. In full general, the completed epitome-upload procedure follows these steps:
- A file is selected for upload past the user in their spider web browser;
- JavaScript is then responsible for making a asking to your web awarding on Heroku, which produces a temporary signature with which to sign the upload request;
- The temporary signed request is returned to the browser in JSON format;
- JavaScript then uploads the file directly to Amazon S3 using the signed request supplied by your Python awarding.
This guide includes information on how to implement the client-side and server-side code to form the complete system. After following the guide, you should accept a working barebones arrangement, allowing your users to upload files to S3. Even so, it is normally worth adding extra functionality to aid better the security of the arrangement and to tailor it for your ain particular uses. Pointers for this are mentioned in the appropriate parts of the guide.
Prerequisites
- The Heroku CLI has been installed;
- A Heroku application has been created for the current project;
- An AWS S3 saucepan has been created. For demonstration purposes we presume a bucket has been created that permits the creation of public objects. In a production environment you may want to use private objects that can exist accessed via signed URLs.
During the beginning few hours after a bucket has been created S3 may return redirects in response to upload requests. If you lot find this behaviour, then waiting a brusk while for your new bucket to completely settle should fix the problem.
Initial setup
Heroku setup
In order for your application to access the AWS credentials for signing upload requests, they will need to be added equally configuration variables in Heroku:
If you are testing locally earlier deployment, remember to add the credentials to your local motorcar's environment, as well.
$ heroku config:fix AWS_ACCESS_KEY_ID=xxx AWS_SECRET_ACCESS_KEY=yyy Calculation config vars and restarting app... done, v21 AWS_ACCESS_KEY_ID => xxx AWS_SECRET_ACCESS_KEY => yyy In addition to the AWS access credentials, ready your target S3 bucket'southward name (non the bucket's ARN):
$ heroku config:prepare S3_BUCKET=zzz Adding config vars and restarting app... done, v21 S3_BUCKET => zzz Using config vars is preferable over configuration files for security reasons. Try to avoid placing passwords and admission keys direct in your awarding's code or in configuration files.
S3 setup
You will at present need to edit some of the permissions backdrop of the target S3 saucepan so that the final request has sufficient privileges to write to the bucket. In a web-browser, sign in to the AWS console and select the S3 section. Select the advisable bucket and click the Permissions tab. A few options are now provided on this folio (including Block public access, Access Control List, Saucepan Policy, and CORS configuration).
Firstly, ensure that "Block all public access" is turned off, and in item plough off "Block public access to buckets and objects granted through new access control lists" and "Cake public access to buckets and objects granted through any admission control lists" for the purposes of this projection. Setting up the bucket in this fashion allows us to read its contents without signed URLs, simply this may non be suitable for services running in product.
Next, you will demand to configure the bucket'south CORS (Cantankerous-Origin Resources Sharing) settings, which will let your application to access content in the S3 saucepan. Each dominion should specify a set of domains from which access to the bucket is granted and as well the methods and headers permitted from those domains.
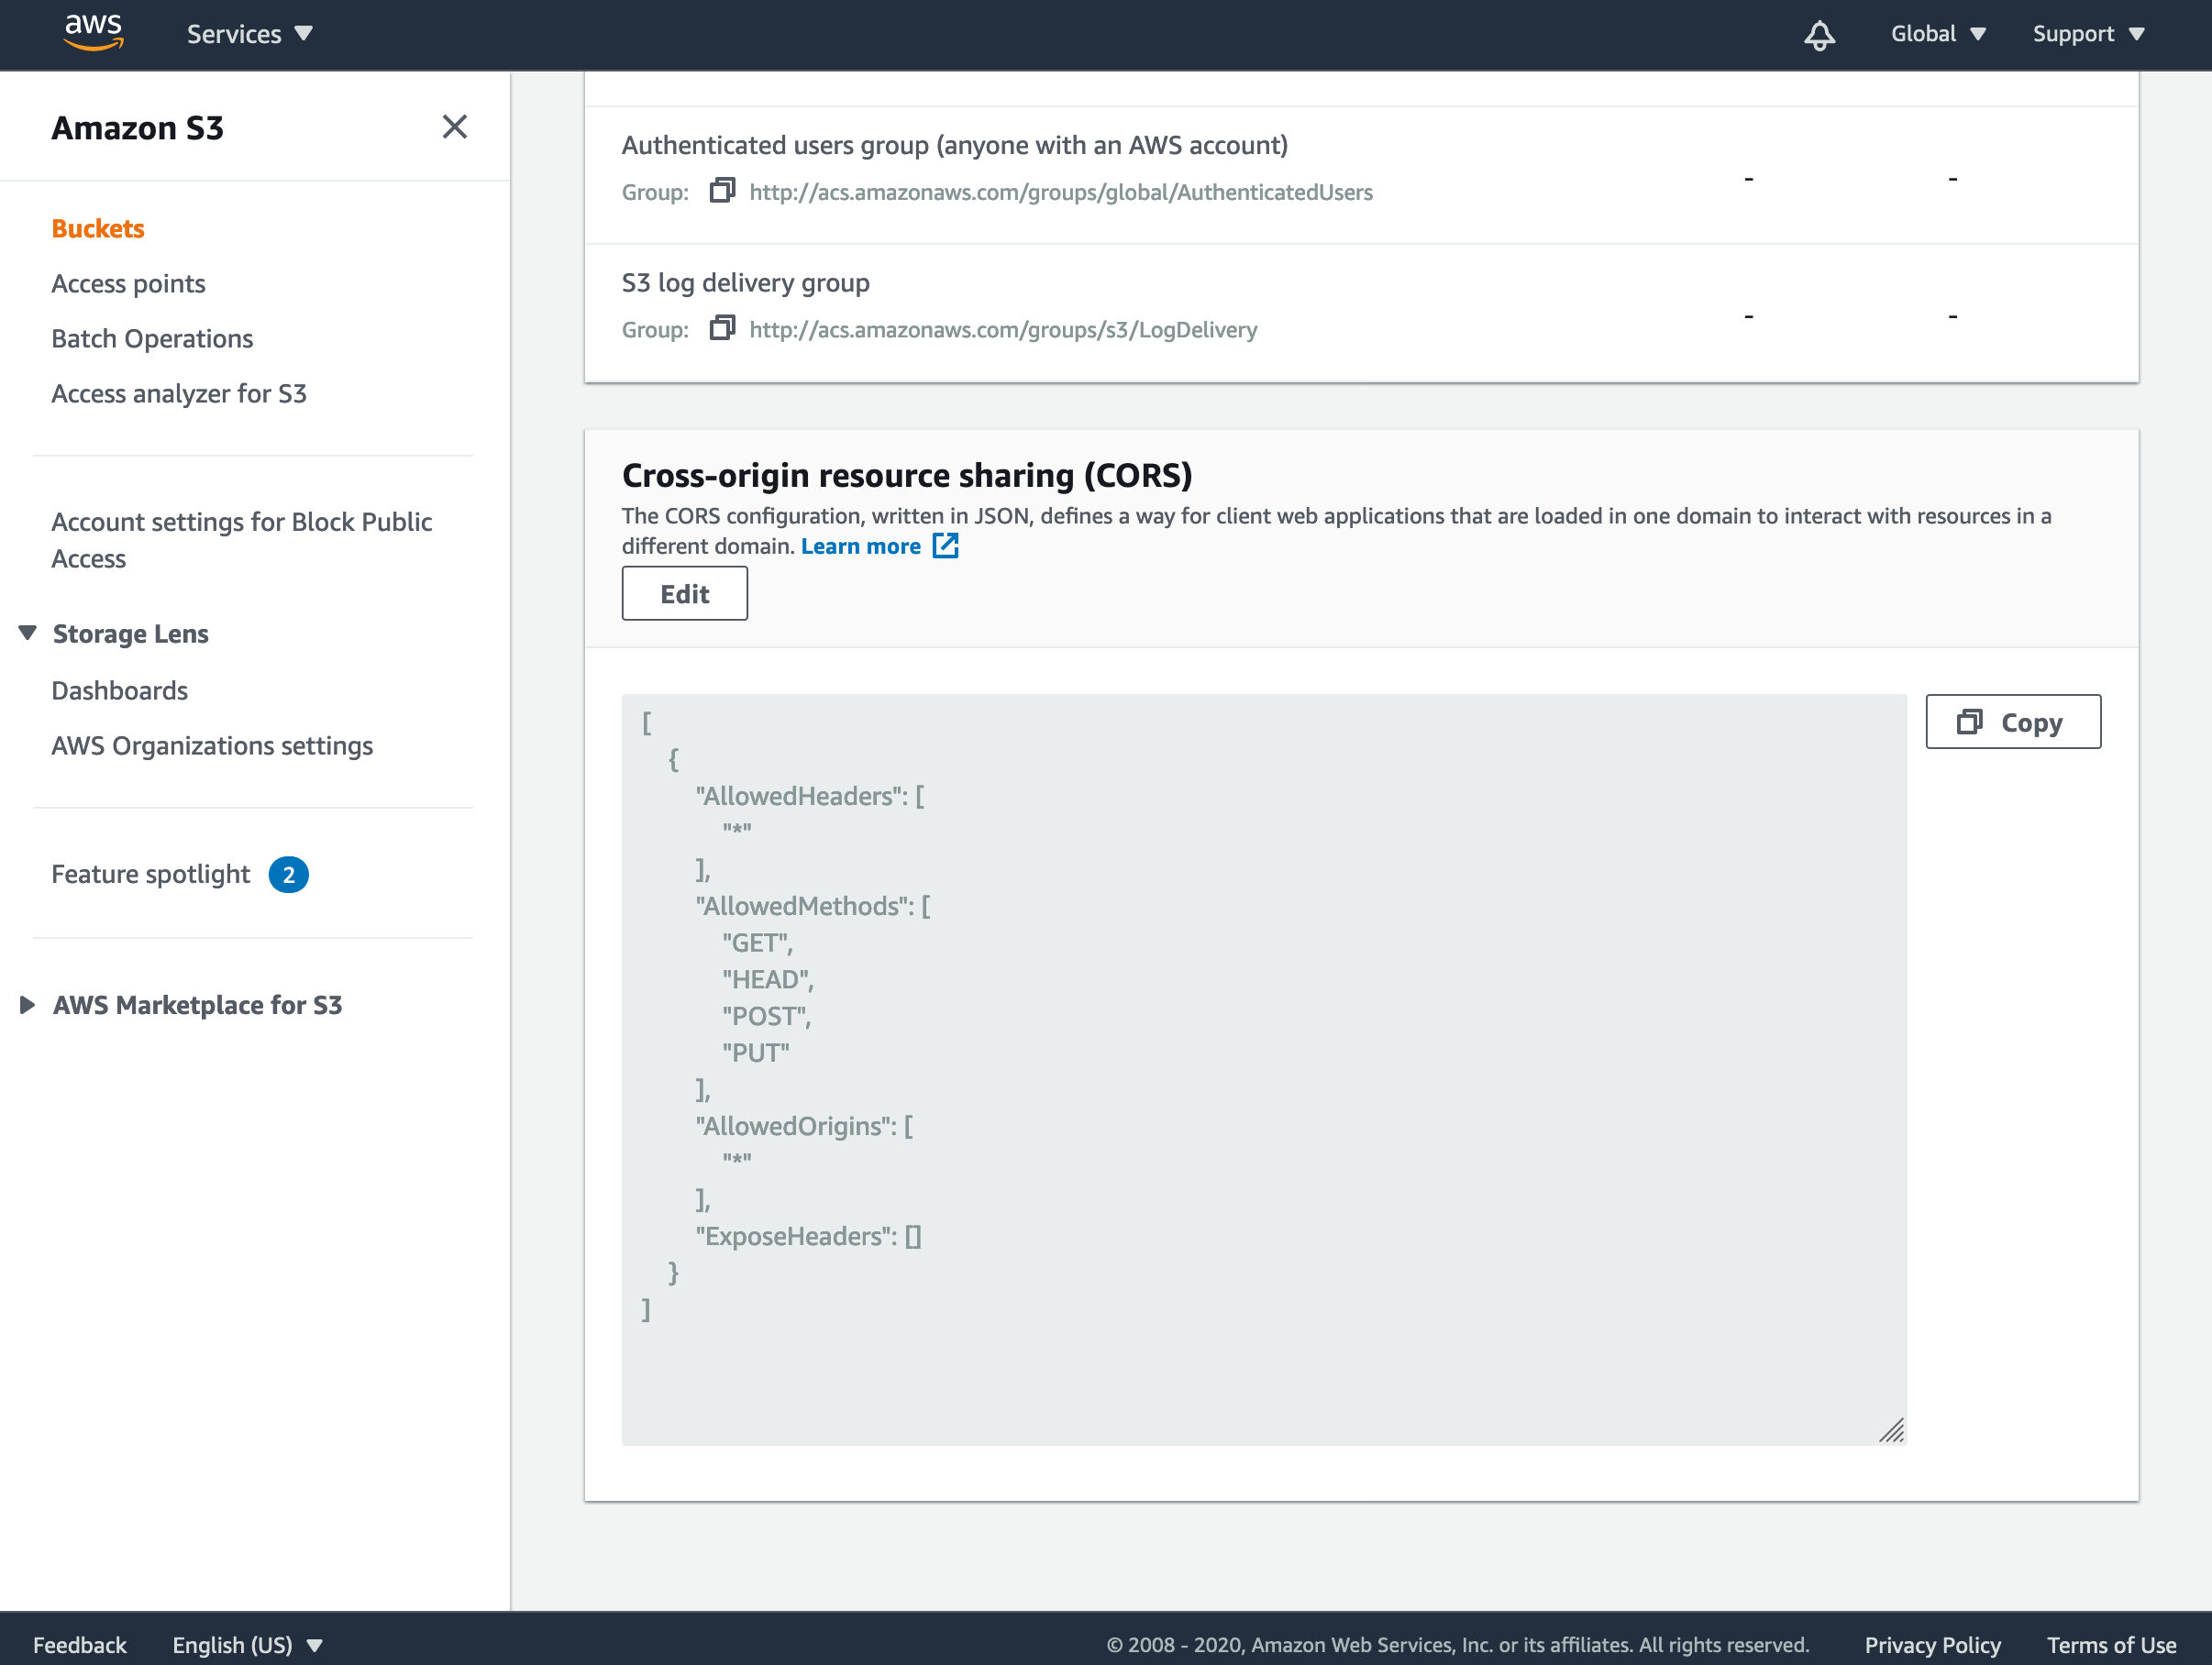
For this to work in your awarding, click Edit and enter the post-obit JSON:
[ { "AllowedHeaders": [ "*" ], "AllowedMethods": [ "GET", "Caput", "POST", "PUT" ], "AllowedOrigins": [ "*" ], "ExposeHeaders": [] } ] Click Save changes and close the editor.
This tells S3 to allow any domain access to the bucket and that requests tin contain any headers. For security, you tin alter the 'AllowedOrigins' array to but accept requests from your domain.
If y'all wish to utilize S3 credentials specifically for this awarding, then more keys can be generated in the AWS account pages. This provides further security, since you lot tin can designate a very specific set of requests that this prepare of keys are able to perform. If this is preferable to you, so you will need to also fix an IAM user in the Edit bucket policy option in your S3 saucepan. At that place are various guides on AWS's web pages detailing how this tin exist accomplished.
Straight uploading
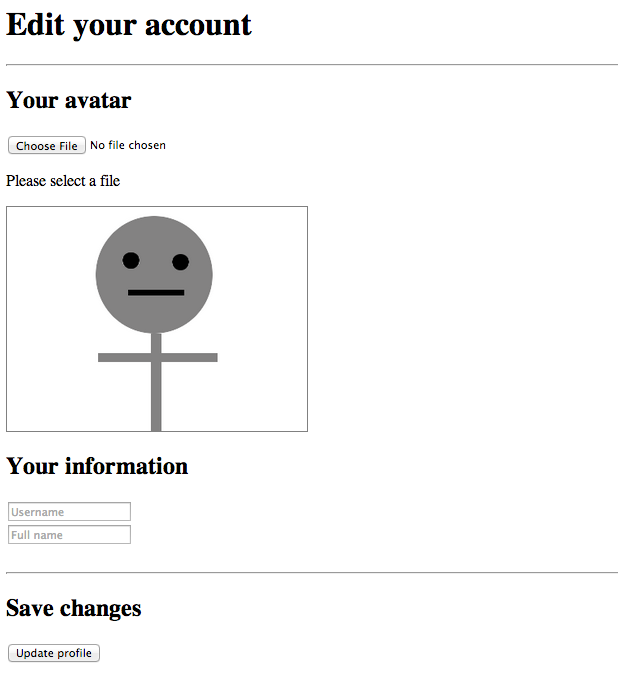
The processes and steps required to accomplish a direct upload to S3 volition exist demonstrated through the use of a simple contour-editing scenario for the purposes of this article. This example volition involve the user being permitted to select an avatar epitome to upload and enter some bones information to exist stored as part of their account.
In this scenario, the following procedure will take place:
- The user is presented with a web page, containing elements encouraging the user to choose an paradigm to upload as their avatar and to enter a username and their ain name.
- An chemical element is responsible for maintaining a preview of the called image by the user. Past default, and if no image is called for upload, a default avatar image is used instead (making the image-upload effectively optional to the user in this scenario).
- When a user selects an image to exist uploaded, the upload to S3 is handled automatically and asynchronously with the process described earlier in this article. The image preview is then updated with the selected image in one case the upload is consummate and successful.
- The user is so free to move on to filling in the rest of the information.
- The user then clicks the
Submitbutton, which posts the username, proper noun and the URL of the uploaded image to the Python application to exist checked and/or stored. If no image was uploaded by the user earlier the default avatar image URL is posted instead.
Setting up the client-side code
No third-party code is required to complete the implementation on the customer-side.
The HTML and JavaScript tin now be created to handle the file choice, obtain the request and signature from your Python application, and then finally make the upload request.
Firstly, create a file called account.html in your application's templates directory and populate the head and other necessary HTML tags appropriately for your application. In the body of this HTML file, include a file input and an chemical element that volition contain status updates on the upload progress. In addition to this, create a form to allow the user to enter their username and total name and a hidden input element to hold the URL of the chosen avatar image:
To run across the completed HTML file, please see the appropriate code in the companion repository.
<input blazon="file" id="file_input"/> <p id="status">Please select a file</p> <img id="preview" src="/static/default.png" /> <form method="POST" action="/submit_form/"> <input type="hidden" id="avatar-url" name="avatar-url" value="/static/default.png"> <input type="text" name="username" placeholder="Username"> <input blazon="text" name="total-proper noun" placeholder="Full name"> <input blazon="submit" value="Update profile"> </class> The #preview element initially holds a default avatar image (which would become the user's avatar if a new image is not chosen), and the #avatar-url input maintains the current URL of the user'south called avatar image. Both of these are updated by the JavaScript, discussed below, when the user selects a new avatar.
Thus when the user finally clicks the Submit button, the URL of the avatar is submitted, along with the username and full name of the user, to your desired endpoint for server-side handling.
The client-side lawmaking is responsible for achieving two things:
- Retrieve a signed asking from the app with which the image can be POSTed to S3
- Really Post the image to S3 using the signed request
JavaScript's XMLHttpRequest objects tin can exist created and used for making asynchronous HTTP requests.
To accomplish this, first create a <script> block and write some code that listens for changes in the file input, one time the document has loaded, and starts the upload process.
(function() { document.getElementById("file_input").onchange = office(){ var files = document.getElementById("file_input").files; var file = files[0]; if(!file){ return alert("No file selected."); } getSignedRequest(file); }; })(); The code too determines the file object itself to be uploaded. If 1 has been selected properly, it gain to call a part to obtain a signed POST request for the file. Next, therefore, write a office that accepts the file object and retrieves an advisable signed request for it from the app.
function getSignedRequest(file){ var xhr = new XMLHttpRequest(); xhr.open("Become", "/sign_s3?file_name="+file.name+"&file_type="+file.type); xhr.onreadystatechange = function(){ if(xhr.readyState === 4){ if(xhr.status === 200){ var response = JSON.parse(xhr.responseText); uploadFile(file, response.data, response.url); } else{ alert("Could non get signed URL."); } } }; xhr.ship(); } The above function passes the file's name and mime type as parameters to the Go request since these are needed in the structure of the signed request, as will be covered afterwards in this commodity. If the retrieval of the signed asking was successful, the office continues past calling a function to upload the actual file:
function uploadFile(file, s3Data, url){ var xhr = new XMLHttpRequest(); xhr.open("Post", s3Data.url); var postData = new FormData(); for(key in s3Data.fields){ postData.append(key, s3Data.fields[central]); } postData.append('file', file); xhr.onreadystatechange = part() { if(xhr.readyState === four){ if(xhr.condition === 200 || xhr.status === 204){ document.getElementById("preview").src = url; document.getElementById("avatar-url").value = url; } else{ alert("Could not upload file."); } } }; xhr.send(postData); } This function accepts the file to exist uploaded, the S3 request information, and the URL representing the eventual location of the avatar image. The latter two arguments volition be returned as part of the response from the app. The office, if the request is successful, updates the preview element to the new avatar image and stores the URL in the subconscious input so that information technology tin can be submitted for storage in the app.
At present, once the user has completed the rest of the form and clicked Submit , the name, username, and avatar image tin can all be posted to the same endpoint.
If you observe that the page isn't working as you lot intend afterward implementing the organization, then consider using console.log() to tape any errors that are revealed by the onreadystatechange function and use your browser's error console to help diagnose the problem.
It is good practice to inform the user of any prolonged activity in any form of awarding (spider web- or device-based) and to display updates on changes. Therefore a loading indicator could exist displayed between selecting a file and the upload being completed. Without this sort of information, users may suspect that the page has crashed, and could try to refresh the folio or otherwise disrupt the upload process.
Setting up the server-side Python code
This section discusses the use of Python for generating a temporary signature with which the upload request can exist signed. This temporary signature uses the AWS access key and cloak-and-dagger access key as a basis for the signature, but users volition not have direct admission to this information. After the signature has expired, then upload requests with the aforementioned signature will not be successful.
As mentioned previously, this article covers the production of an application for the Flask framework, although the steps for other Python frameworks volition be like. Readers using Python iii should consider the relevant data on Flask's website before continuing.
To see the completed Python file, please see the appropriate code in the companion repository.
Start by creating your chief awarding file, application.py, and set up up your skeleton awarding appropriately:
from flask import Flask, render_template, request, redirect, url_for import bone, json, boto3 app = Flask(__name__) if __name__ == '__main__': port = int(os.environ.get('PORT', 5000)) app.run(host='0.0.0.0', port = port) The currently-unused import statements will be necessary subsequently. boto3 is a Python library that will generate the pre-signed Mail service request. This, along with Flask, tin can exist installed merely using pip.
Side by side, in the same file, yous will need to create the views responsible for returning the correct information dorsum to the user's browser when requests are fabricated to various URLs. Outset ascertain view for requests to /business relationship to render the page account.html, which contains the form for the user to complete:
@app.route("/account/") def business relationship(): render render_template('business relationship.html') Delight note that the views for the awarding will need to exist placed between the app = Flask(__name__) and if __name__ == '__main__': lines in awarding.py.
Now create the view, in the aforementioned Python file, that is responsible for generating and returning the signature with which the customer-side JavaScript can upload the image. This is the first request made by the customer earlier attempting an upload to S3. This view responds with requests to /sign_s3/:
@app.road('/sign_s3/') def sign_s3(): S3_BUCKET = os.environ.go('S3_BUCKET') file_name = request.args.get('file_name') file_type = request.args.get('file_type') s3 = boto3.client('s3') presigned_post = s3.generate_presigned_post( Bucket = S3_BUCKET, Key = file_name, Fields = {"acl": "public-read", "Content-Type": file_type}, Conditions = [ {"acl": "public-read"}, {"Content-Blazon": file_type} ], ExpiresIn = 3600 ) return json.dumps({ 'data': presigned_post, 'url': 'https://%s.s3.amazonaws.com/%s' % (S3_BUCKET, file_name) }) If your saucepan is in a region that requires a v4 signature, then you lot can modify your boto3 client configuration to declare this:
s3 = boto3.customer('s3', config = Config(signature_version = 's3v4')) This lawmaking performs the following steps:
- The request is received to
/sign_s3/and the S3 bucket name is loaded from the environment. - The name and mime type of the object to exist uploaded are extracted from the
GETparameters of the request (this stage may differ in other frameworks). The parameters are provided by the JavaScript discussed in the previous section. - An S3 client is constructed using the
boto3library. At this phase, theAWS_ACCESS_KEY_IDandAWS_SECRET_ACCESS_KEYset before are automatically read from the environment. - The pre-signed Mail request information is then generated using the
generate_presigned_postrole. To this is passed the bucket name, the name of the file, some parameters to permit the uploaded file to be publicly readable, and an expiry time of the signed asking (in seconds). - Finally, the pre-signed request data and the location of the eventual file on S3 are returned to the client every bit JSON.
You lot may wish to assign another, customised name to the object instead of using the 1 that the file is already named with, which is useful for preventing accidental overwrites in the S3 bucket. This proper name could exist related to the ID of the user's business relationship, for example. If not, you should provide some method for properly quoting the proper name in instance there are spaces or other awkward characters nowadays. In addition, this is the stage at which yous could provide checks on the uploaded file in order to restrict admission to certain file types. For example, a elementary check could be implemented to let only .png files to proceed beyond this signal.
Finally, in application.py, create the view responsible for receiving the business relationship information after the user has uploaded an avatar, filled in the grade, and clicked Submit . Since this will be a POST request, this will also need to be defined as an 'allowed admission method'. This method will respond to requests to the URL /submit_form/:
@app.route("/submit_form/", methods = ["Post"]) def submit_form(): username = request.course["username"] full_name = request.course["full-proper noun"] avatar_url = request.form["avatar-url"] update_account(username, full_name, avatar_url) return redirect(url_for('profile')) In this example, an update_account() function has been called, but creation of this method is not covered in this article. In your application, you lot should provide some functionality, at this stage, to allow the app to store these account details in some class of database and correctly acquaintance the data with the rest of the user'south account details.
In add-on, the URL for the contour page has not been defined in this article (or companion code). Ideally, for instance, later updating the account, the user would be redirected back to their own profile so that they can see the updated data.
Running the app
Everything should at present be in place to perform the directly uploads to S3. To test the upload, save whatever changes and use heroku local to start the awarding:
You volition need a Procfile for this to be successful. See Getting Started with Python on Heroku for information on the Heroku CLI and running your app locally. Also call up to correctly set your environment variables on your own machine before running the awarding locally.
$ heroku local 15:44:36 web.1 | started with pid 12417 Press Ctrl+C to return to the prompt. If your application is returning 500 errors (or other server-based issues), then first your server in debug style and view the output in the Terminal emulator to assist set your problem. For case, in Flask:
... app.debug = Truthful port = int(bone.environ.become('PORT', 5000)) app.run(host='0.0.0.0', port=port) Summary
This article covers uploading to Amazon S3 straight from the browser using Python to temporarily sign the upload request. Although the guide and companion code focuses on the Flask framework, the idea should easily carry over to other Python applications.
Source: https://devcenter.heroku.com/articles/s3-upload-python
0 Response to "Upload a Csv File to S3 Using Python"
Post a Comment